Xpost: productivity tool for content creator & technical writer

Hi friends, welcome to this new article 👋
As you may have guess, Today’s article will be a little bit “special”, we are going to talk about the project I submitted to the Hashnode x Netlify hackathon!
Disclaimer, here are the links to the live version and the code:
Oh and other disclaimer, I wrote this blog post using the tool I'm going to introduce 😄
The problem
First of all, let’s talk about the problem I tried to address. As technical writer and / or content creator we are often using multiple platforms to share our articles. This is called "cross-posting" and it allows (if it is well executed) to generate more traffic on your content.
This looks pretty straight right ?
However, it is not as easy for two main reasons:
- In order to keep your SEO as efficient as possible you have to define the original URL of your article (where it was initially published) aka canonical URL. This canonical URL must be passed to every other platform to let the search engine know it is not a duplicate.
- Once you published your blog post on a first platform and get your canonical URL you have to copy-paste your article on every other platforms you want to publish. It is a very repetitive and boring task.
Idea & features
To address this problem, my idea was to create a “hub”, where every content creator get a personal dashboard, the ability to connect their favorite platforms and to create articles thanks to a consistent writing editor. Once a draft is ready to be published, you only have to click a button to directly send it to one or multiple of your blogging platforms without worrying about anything.
Article editor
I started by focusing on the text editor because that’s where we all spend the most time. I wanted to create a nice writing experience so I chose a Notion-like editor. As the image show bellow, it is a markdown editor with instant rendering and shortcut commands (using /). This is (in my opinion) the best compromise between comfort and efficiency.
To make it more convenient I also added an auto-save feature so you don’t have to worry about forgetting.
It is also possible to add images (through a command or by dropping it), embedded videos (youtube).
Finally, just like Notion, you can highlight text to apply styling (bold, line through, etc).
Dashboard
Concerning the dashboard, the idea was to allow the user to manage his blogging platforms, get useful insight but most importantly to find his drafts and published articles.
I also added some quick actions. It is then possible to publish / delete a draft and visit a published article from the dashboard.
I tried to focus on the UI/UX to make each step as easy as possible for the user. You can see below the flow to add a new platform:
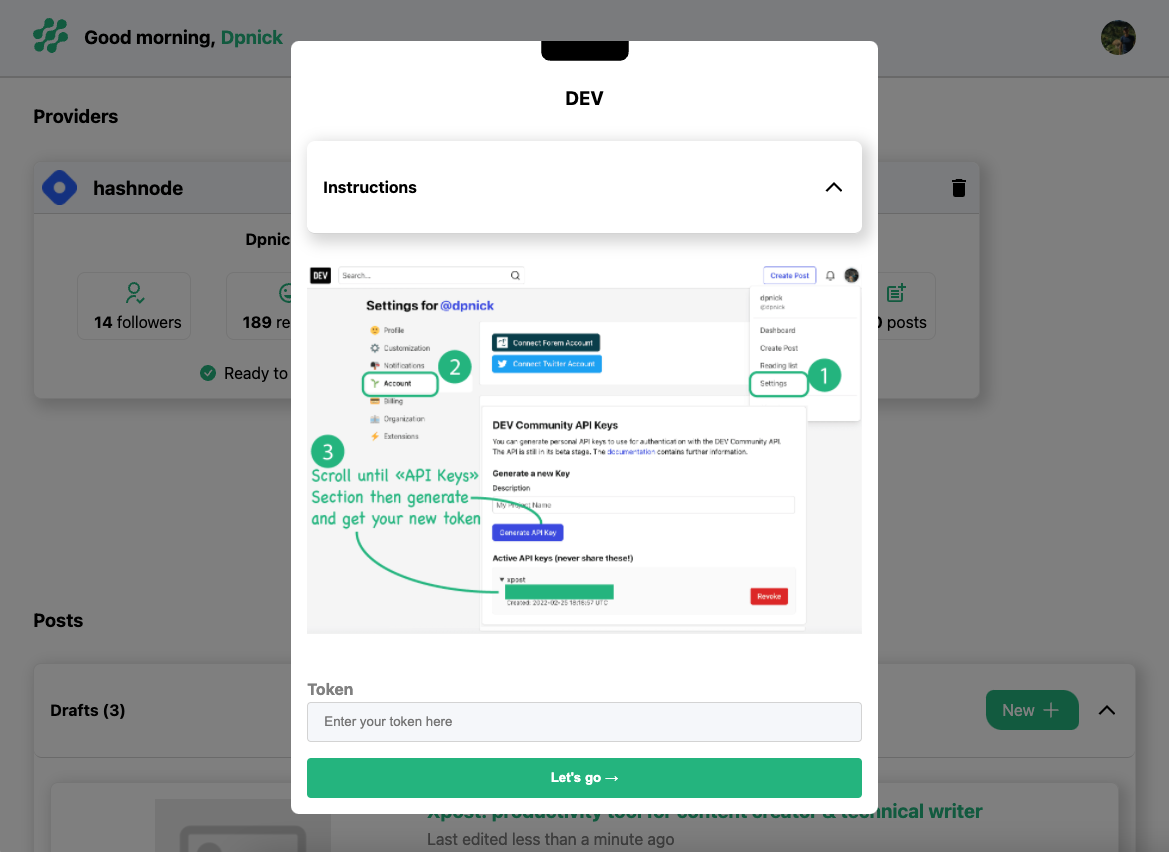
After choosing a platform, instructions are shown in a modal to explain to the user where to find the requested informations. He then only have to confirm to get ready.
The publication flow is quite similar:
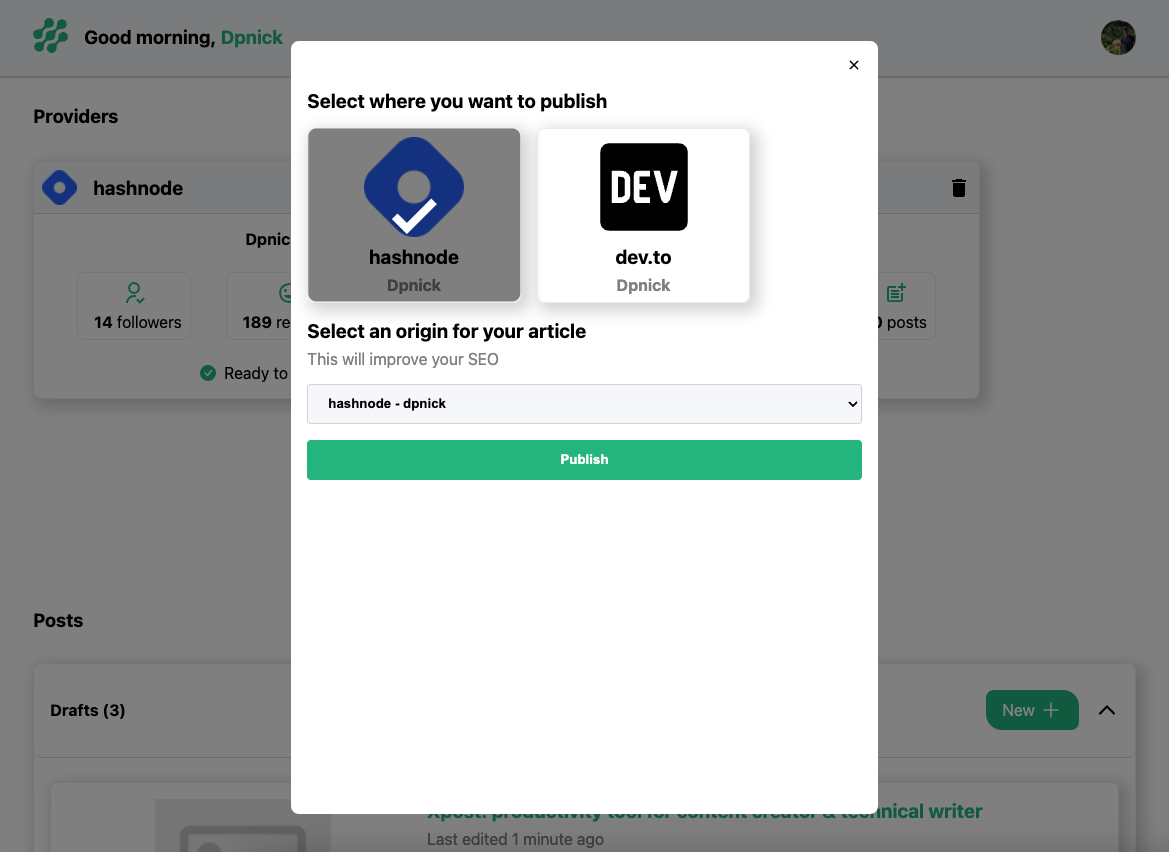
After clicking “Publish”, a modal appear, the user must choose one or multiple platforms to publish his article. If more than one are selected, he can choose which one to use as original URL thanks to a simple dropdown. Once published the user has the ability to share the original URL on Twitter. That's it, all the hard work is automatically handled on our side.
Responsiveness
Of course, I made sure that XPost was fully usable on mobile as you can see here:
Landing page
Finally, I created a landing page to introduce XPost to new users. This is a simple page which quickly presents how it works and why they should use it.

Tech
Stack
This project required multiple technologies that i’m going to introduce:
- Next.js (typescript) for front-end and API
- styled-components & styled-system for custom UI components
- Netlify for hosting and serverless functions
- Next-auth for authentification
- planetscale & prisma for database
- cloudinary for images
- Hashnode & dev.to APIs
Coding practices
- Fully typed using Typescript
- Strict ESLint configuration
- Husky to run types and linter before committing
- Local Prettier to format code
- App architecture (splitting business logic and UI)
- data fetching best practices (SWR, caching, static props)
- Generic & reusable UI components
- SEO ready
My code is available here
What I learned
I really like hackathons to challenge myself on new stacks. This time it was the opportunity to work with Netlify, Planetscale and Prisma. I have to say, these are all amazing tools to work with, they greatly improved my efficiency during this hackathon.
Also, even for an experienced front-end developer like me, it's always nice to be able to add new skills and products to my portfolio 🙂
What to expect next
This is just the beginning for this project, I planned to add a lot of new features like:
- more blogging platforms
- scheduling article (almost ready)
- calendar view
- integrate other content creator tools (like communication)
If you are interested in this project, you can send me a message on Twitter ! 🙂
Thanks you so much for reading, I hope you enjoyed it as much as I do! Feel free to leave a comment if you have any questions!
See you soon!
Yannick 👋


